
RULES 3 AND 4 OF THE FUNNEL
~ 12 min reading · ~ 55 min at Neave’s pace
Rules 3 and 4 of the Funnel
The motivation for the various Rules of the Funnel is discussed in DemDim Chapter 5, so there is no need for me to go into great detail here. The important issue here is how well they work. So I’ll summarise the motivations for Rules 3 and 4 quite briefly. Firstly, Rule 2 was a relatively complicated operation—you might have had to concentrate quite hard to get it right. Rule 3 is a rather easier and (at least at first sight) an apparently rather innocent variant of Rule 2. Rule 4 is quite different from both of them: it concentrates on trying to minimise the average short-term variation. The latter is, of course, an interesting mixture of good and bad. It is certainly good to reduce variation, but is it wise to do so only in the short term? Let’s carry out similar procedures as previously, but now for Rules 3 and 4, and see what happens.
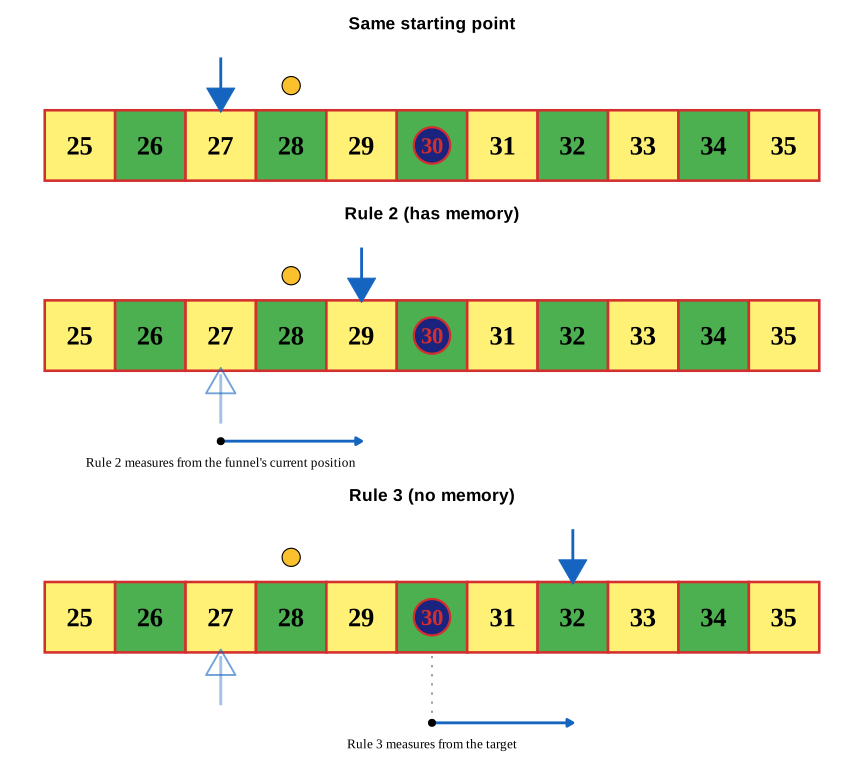
Recall that in Rule 2 the distance and direction between the target and where the marble comes to rest is described in red just below the yellow-shaded rows (refer back to page 42, in the First Two Rules of the Funnel section above). Rule 2 then shifts the funnel in the opposite direction by that same distance from its current position. The difference between Rules 2 and 3 is that, in Rule 3, the funnel is instead placed on the opposite side of the target and at that same distance from it. E.g., suppose that the current outcome (position of ●) is 32 (i.e. 2 above or to the right of ◎). Then, with Rule 3, the funnel simply gets placed 2 squares to the left of ◎, i.e. at 30 − 2 = 28—irrespective of where it was before. Or, if the current outcome was 27 (3 below or left of ◎), the funnel is then placed 3 squares to the right of ◎, i.e. at 30 + 3 = 33. This is indeed easier than Rule 2: you’ll soon see that the marble and the funnel now simply finish up symmetrically positioned either side of the target—the funnel’s previous position in no way affects this decision. In case of doubt, just refer to this little table:
| If ● is at … | … 25 | 26 | 27 | 28 | 29 | 30 | 31 | 32 | 33 | 34 | 35 | … |
|---|---|---|---|---|---|---|---|---|---|---|---|---|
| you move ▼ to … | … 35 | 34 | 33 | 32 | 31 | 30 | 29 | 28 | 27 | 26 | 25 | … |
So, using your own track, let’s walk through the first few stages with Rule 3. As usual, we’ll start with the funnel at 30. With the first dice-score being 10 corresponding to the marble finishing up at 3 right of the funnel, the marble’s first finishing position is again 33:
Describe this diagram
End of Stage 1 with Rule 3. The funnel is still at its starting position of 30 (the target) and the marble has come to rest at 33, three squares to the right of the funnel — matching the first dice-score of 10.
Now (checking if necessary in that little table), with the marble being at 33 (3 right of ◎), you move the funnel to the other side of the target and at that same distance from it, i.e. to 27 (3 left of ◎):

Describe this diagram
Rule 3 has just moved the funnel from 30 to 27, the mirror image of the marble’s position 33 about the target 30. The marble still sits at 33 — the symmetric “either side of the target” arrangement that defines Rule 3.
You’ll realise that this is actually the same as the initial move with Rule 2; but that is simply because the funnel was initially at the target, i.e. in both cases the funnel moved from a starting position of 30.
The second dice-score was 8 corresponding to the marble dropping at 1 right of the funnel, and so the next position of the marble is 28:

Describe this diagram
End of Stage 2 with Rule 3. The funnel is still at 27 and the marble has come to rest at 28, one square to the right of the funnel — matching the second dice-score of 8.
Since the marble is now at 28 (2 left of ◎), Rule 3 moves the funnel to 32 (2 right of ◎), i.e. to the opposite side of the target and at that same distance from it. Remember, at this and every stage, you simply move the funnel so that it and the marble are symmetrically placed either side of the target ◎:

Describe this diagram
Rule 3 has just moved the funnel from 27 to 32, the mirror image of the marble’s position 28 about the target 30. The marble still sits at 28 — funnel and marble are again symmetrically placed two squares either side of the target.
Editorial note: the figure below lines up all three positions — 27, 29 and 32 — to show Rules 2 and 3 making the same-sized move but from different origins.
Describe this diagram
Three stacked funnel tracks running 25 to 35, all starting from the same state: funnel at 27, marble at 28. Row 2 shows Rule 2’s move: the funnel goes to 29, a 2-square arrow measured from its own prior position at 27, where a faint ghost marker is left behind. Row 3 shows Rule 3’s move: the funnel goes to 32, a 2-square arrow of the same length, but measured from the target at 30 — a dotted line drops from the target square to confirm the arrow starts there, not at the ghost marker still shown at 27. Same distance, same direction, different origin, different destination.
The third dice-score was 6 corresponding to the marble dropping at 1 left of the funnel. So the marble now finishes up at 31. 31 is 1 right of ◎, and thus you move the funnel to 29 (1 left of ◎), giving:

Describe this diagram
End of Stage 3 with Rule 3. The marble dropped one square to the left of the funnel (which was at 32), so it has come to rest at 31. Rule 3 then moved the funnel to 29, the mirror of 31 about the target 30 — one square either side of ◎.
And so on. The fourth and fifth dice-scores were 7 and 4 corresponding respectively to the marble falling directly under the funnel and 3 to the left of the funnel. Carefully confirm with your track that the next finishing positions are: marble under funnel at 29, funnel moved to 31, marble at 28, and funnel moved to 32.
Just for interest, take a moment’s thought to guess what will happen in the long term as you take Rule 3 through its 40 stages. Then, later on, see if you’ve guessed correctly!
And now draw the run chart, continuing on from my first five points. Again, as with the histograms, there’s no need to be too artistic about it—please yourself whether or not you use a ruler!
Recall that the very first stage in Rule 3 was identical to that in Rule 2 but, as was pointed out at the time, this was simply because the funnel was initially at its “sensible” value of 30. I imagine, however, that you subsequently discovered things changed with Rule 3 … . You may recall Peter Worthington’s observation (page 29, in the Control Chart + Brain section above) that a zig-zag pattern is not random variation!
[Move on to the description of Rule 4 on the next page.]
Rule 4 of the Funnel
Lacking basic understanding of variation, management may with best intentions have used Rules 2 and/or 3 in the hope that they would produce better results than Rule 1. They have failed dismally: instead they have considerably increased variation. Therefore they now try something completely different. Since it is good to reduce variation, they strive to minimise variation at least in the short term. Certainly there are circumstances where this may seem quite reasonable in practice. For example, if you don’t get exactly what you want from a supplier, but at least what you receive doesn’t change much from one delivery to the next, it is quite possible that you can learn to “cope” (for a while) with whatever arrives. The situation that really throws you is when you get dramatic changes from one delivery to the next (which presumably is what happened to you sooner or later during Rule 3)—that’s part of the motivation for trying Rule 4.
So, what do we do with the funnel in Rule 4? Suppose the current outcome is 33. The thinking is now that, for low short-term variation, we would like the next outcome to be 33 again or pretty close to it. How do we achieve that? Easy! Place the funnel exactly where the marble has just finished up, i.e. at 33. You will have noticed that (again unless you’ve had a very unusual sequence of dice-scores) most of the time the marble was finishing up quite close to the funnel—say, no more than 2 squares away from it. So, in this case, the chances are that your next outcome will now be somewhere between 31 and 35—nicely consistent with the aim of achieving low short-term variation, and certainly generally more appealing than what Rule 3 eventually produced!
Take a look at my fantastic outcomes (the yellow-shaded row) near the top of page 54, below! Hardly any variation for a while; and then, when there is a larger move, we find ourselves right back on the target of 30! (As you might realise, that was a very happy accident.) I wonder what will happen in the longer term …
So, just to be sure, let’s again walk through the first few stages. As always, with the funnel initially being placed at 30 and the first dice-score being 10, the first outcome is again 33:

Describe this diagram
End of Stage 1 with Rule 4. The funnel started at its target position of 30 and the marble has come to rest at 33, three squares to the right of the funnel — matching the first dice-score of 10. This first stage is identical to Rules 2 and 3, because the funnel was initially at the target.
So, as argued near the bottom of page 50, Rule 4 then places the funnel directly above the marble at 33:

Describe this diagram
Rule 4 has just moved the funnel from 30 to 33 — directly above the marble. Funnel and marble now sit on the same square. This is the defining move of Rule 4: place the funnel exactly where the marble has just finished up.
The second dice-score was 8 corresponding to the marble dropping at 1 right of the funnel, and so the next position of the marble is 34:

Describe this diagram
End of Stage 2 with Rule 4. The funnel is still at 33 and the marble has come to rest at 34, one square to the right of the funnel — matching the second dice-score of 8.
And then the funnel immediately follows it there:

Describe this diagram
Rule 4 has just moved the funnel from 33 to 34, directly above the marble. Funnel and marble are again on the same square — the funnel “immediately follows” wherever the marble lands.
The third dice-score was 6 which corresponds to the marble dropping at 1 left of the funnel, i.e. back to 33, and so Rule 4 moves the funnel back to 33 as well:

Describe this diagram
End of Stage 3 with Rule 4. The marble dropped one square to the left of the funnel (which was at 34), so it has come to rest back at 33. Rule 4 then moves the funnel back to 33 to sit above the marble — funnel and marble are once again on the same square.
And so it continues. The fourth and fifth dice-scores were 7 and 4 corresponding respectively to the marble falling directly under the funnel and then 3 to the left of the funnel. Confirm that the next positions are Stage 4: both marble and funnel still at 33, and Stage 5: both marble and funnel finish up at 30. So the picture stays unchanged at the fourth stage and, at the fifth stage, both the marble and then the funnel end up at the target of 30—the “happy accident” to which I referred on page 52, above.
So off you go for the final time. Again if you didn’t do so when I first suggested it, you’ll need to start by copying over all your “From ▼, ● then goes” rows one final time. Then, after you’ve generated all your Rule 4 outcomes, finish off by sketching your run chart. As usual, I’ve started the run chart for you on the graph-paper. Also, as with Rule 3, do have an early guess at what you think will happen in the long term!
Rule 4 is one of the easier strategies to carry out, so you can stop using your track as soon as you realise you don’t need it any more. That may be very soon!