SECTION 1: YOUR RADAR DIAGRAM
~ 8 min reading
Section 1: YOUR RADAR DIAGRAM
First (well, here’s a treat), no hard thinking for the next few pages!
Let’s see why I asked you to enter those 0–5 “scores” of what you saw as the strengths of connections between the System of Profound Knowledge and the 14 Points and the Deadly Diseases during the Second Project. I’d like you to collect them together in a “radar diagram”, and then we’ll see what that tells you about your current understanding of the Deming philosophy. (And again, this is just for you—so you may as well be honest. Sorry to sound like an old-fashioned parent but … if you cheat then you’ll only be cheating yourself!)
Your radar diagram will finish up containing 19 simple four-sided shapes (“quadrilaterals”). You’ll have one such shape for each of the 14 Points and the five Deadly Diseases. Of course, to make the diagram easy to interpret, it will help greatly if the 19 shapes are all distinguishable from each other! That is why I asked you to gather together a number of different-coloured pens and/or pencils for today.
How will you be able to distinguish the 19 shapes from each other? I could have asked you to find 19 different-coloured pens and pencils for this Activity—that would have been an obvious but rather extravagant option! However, if you just have around half-a-dozen different colours, you could use each colour three or four times, say with one shape being drawn using four ordinary continuous lines, another using four broken lines, another using four dotted lines, etc.
ACTIVITY 12–a, Part 2
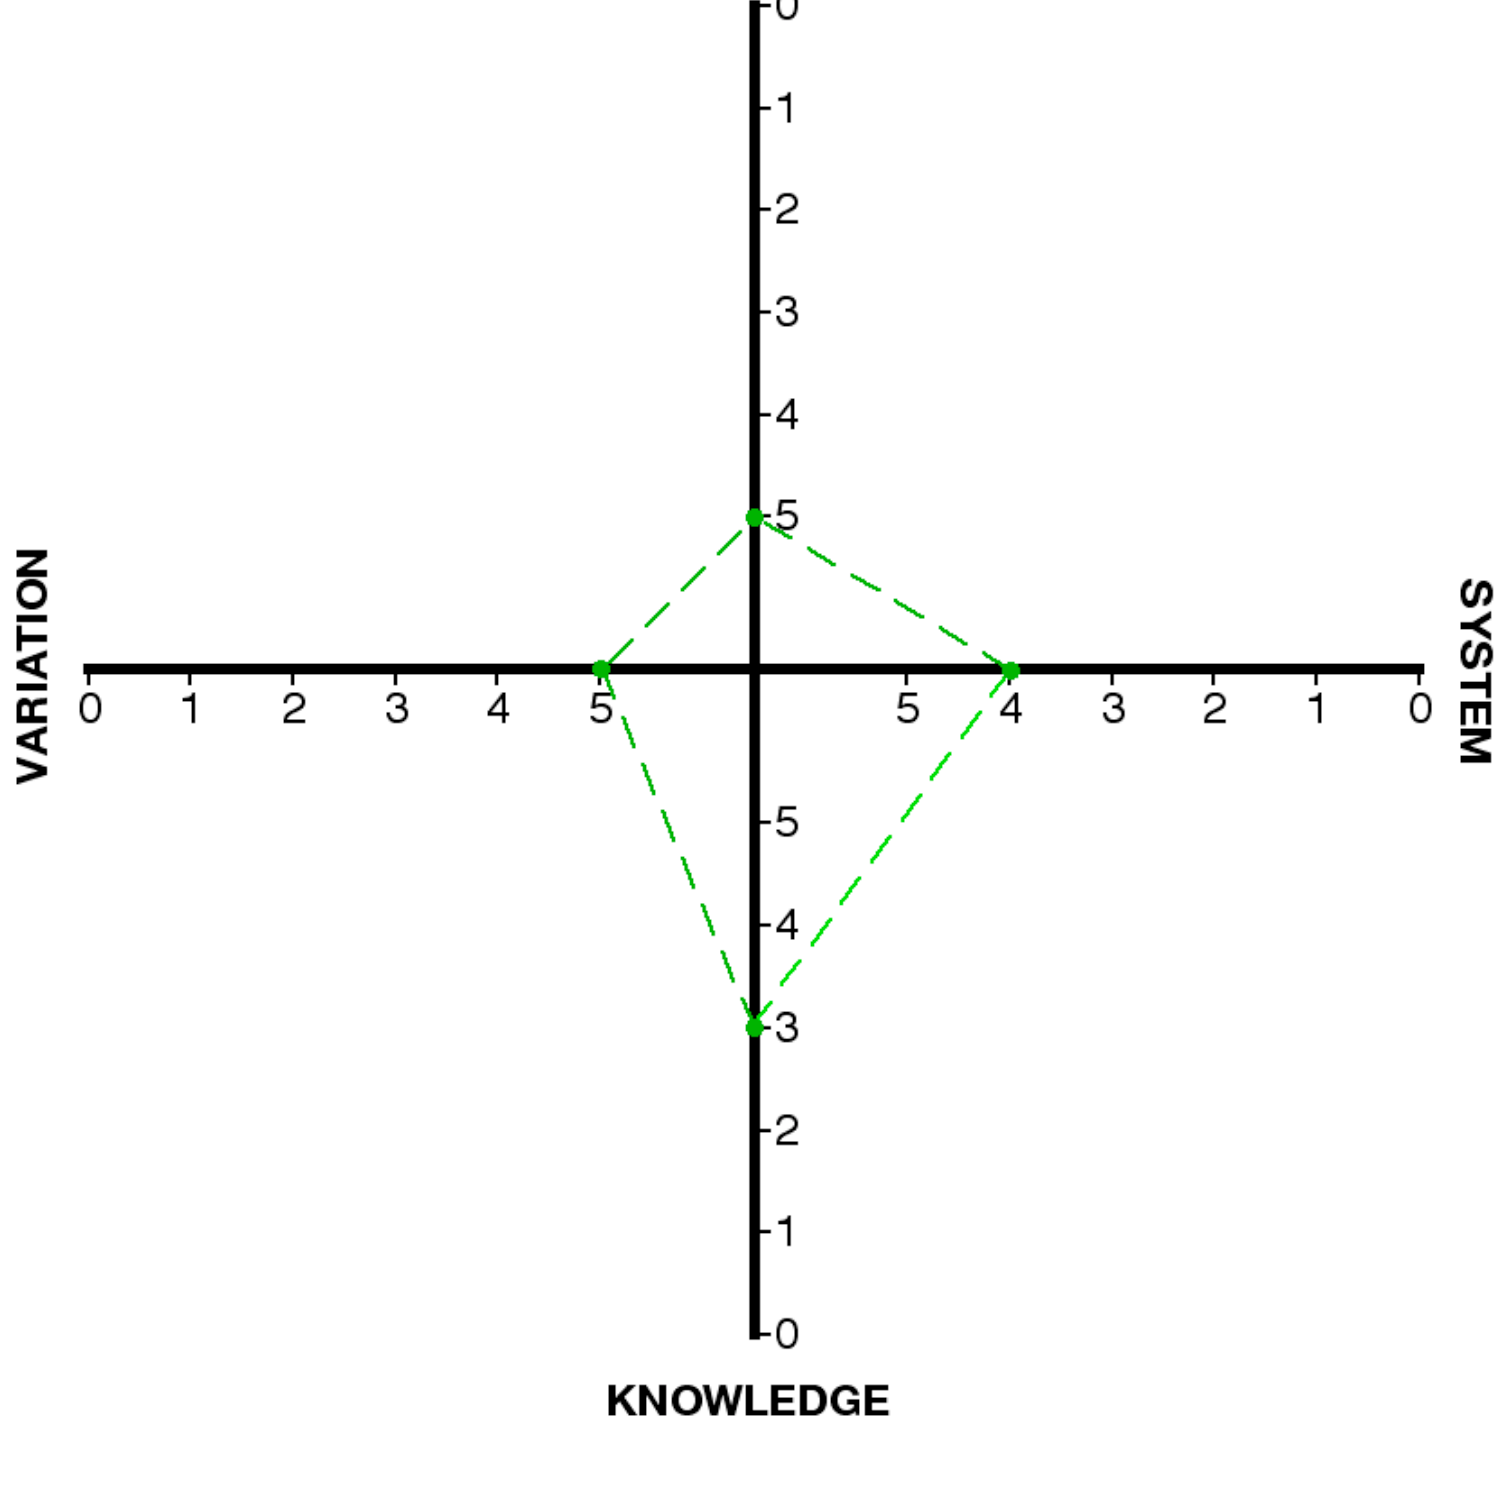
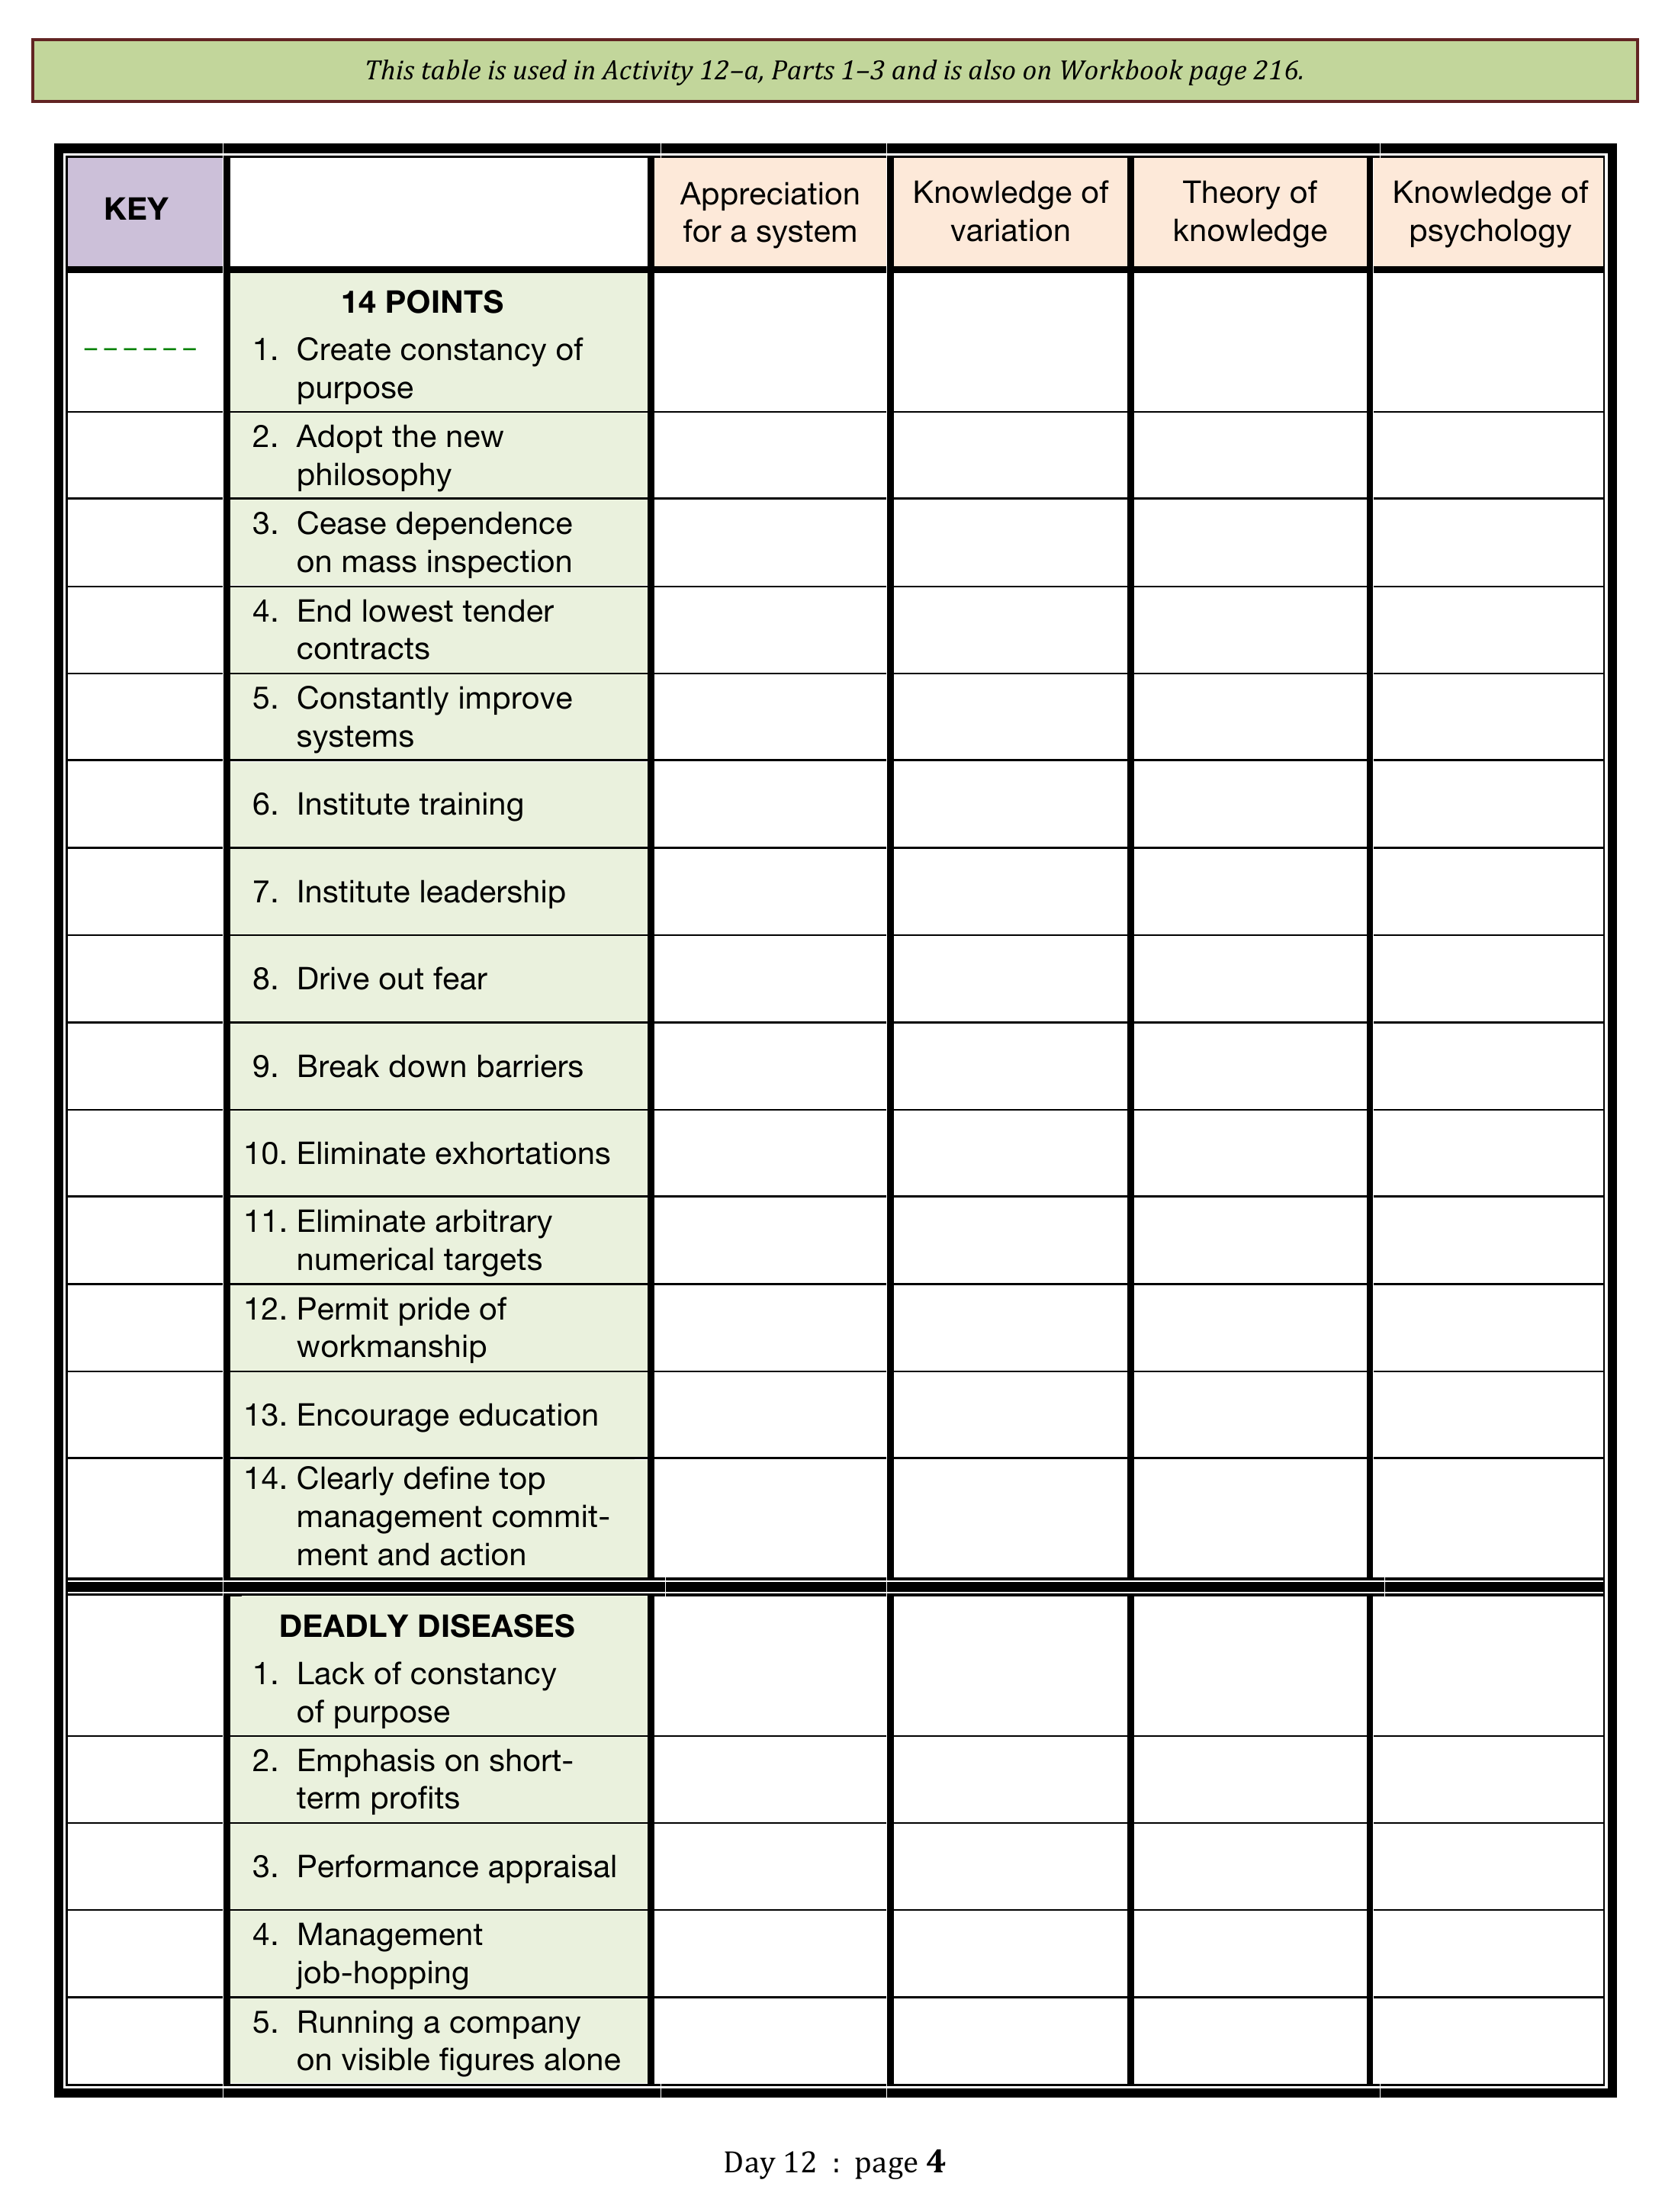
So now choose your 19 combinations of colours and line styles and indicate them in the KEY column on page 4, one against each of the 14 Points and each of the five Deadly Diseases. For example, if you’ve decided that your four-line shape for Point 1 (Create Constancy of Purpose) is to be drawn with broken green lines: – – – – – – as in the diagram on page 3, indicate that as I’ve shown in the KEY column on page 4.
Having completed the KEY column, you’re now ready to construct your radar diagram. Take a look at the diagram on page 3. You’ll immediately guess what I’m going to ask you to do. In this illustration, remember I’m supposing Point 1 will be represented by a shape consisting of four broken green lines: – – – – – – .
Let’s suppose you’ve scored the strength of connection of Point 1 with both Understanding Variation and Knowledge of Psychology by 5, with Theory of Knowledge by 3, and with Appreciation for a System by 4. (I’m not saying that these are the “right” answers—there are no right answers except for the honest representation of what’s in your head!) Then you simply mark the relevant points on the diagram’s four “arms” (PSYCHOLOGY, SYSTEM, etc), and join them up using the chosen KEY: broken green lines.
Describe this diagram
A four-armed radar (or “kite”) chart used as the worked example for Activity 12–a. The four arms — PSYCHOLOGY (top), SYSTEM (right), KNOWLEDGE (bottom), VARIATION (left) — each carry a 0-to-5 scale, with 0 at the centre and 5 at the tip. For Point 1 (“Create Constancy of Purpose”), Neave’s illustrative scores are plotted: 5 on PSYCHOLOGY, 4 on SYSTEM, 3 on KNOWLEDGE, 5 on VARIATION. The four points are joined by broken green dashes (the chosen KEY for Point 1), forming a four-sided shape. Each of the 14 Points and five Diseases is plotted the same way, so 19 such shapes will eventually be overlaid on a single radar; the relative size and position of each shape will reveal which parts of the System of Profound Knowledge most strongly underpin which Point or Disease.
ACTIVITY 12–a, Part 3
Ready, go! Using your chosen KEYs in turn, carry out this procedure on page 5, illustrating your scores that you’ve recorded in the table on page 4 for all the 14 Points and five Deadly Diseases.
Interpretation of your radar diagram
So, how to interpret the radar diagram once you’ve completed it? Again, no deep thought is required—although there may be some as a result of your interpretation!
Do you recall The 14 Points … follow naturally … (Day 9 page 16)? So let’s see! Now, it would be unrealistic to think that you—or anybody else, including myself—would have scored 5 everywhere throughout the Second Project, in which case all 19 shapes would have been one simple, small diamond connecting the four 5s. But you should feel pleased if the majority of your scores have genuinely been, say, 3s, 4s or 5s, thus leaving plenty of white space outside the bigger diamond that you’d get by joining up the four 3s. If that’s true then it will indicate you’ve made a really good start on understanding the Deming philosophy.
You could also investigate the diagram for some more detailed information. There may, for example, be a small number of the 19 four-sided shapes that immediately strike you as being rather more spread out than the others. This would indicate that it might be worthwhile for you, when you have the opportunity, to spend more time reading and thinking about the particular Points and/or Diseases corresponding to those spread-out shapes. So let me remind you of some of the sources I recommended to you back on Days 4 and 5.
If the radar diagram indicates that one or two of the Points need some further attention, you could browse through the relevant chapter(s) in DemDim Part 5 (where there is a separate chapter on each of the 14 Points). Some of the earlier books on Dr Deming’s work also have a chapter on each Point, particularly the first of both Mary Walton’s and Bill Scherkenbach’s books (respectively The Deming Management Method and The Deming Route to Quality and Productivity). And then, of course, there is the hefty Chapter 2 in Out of the Crisis. If the radar diagram shows that you need to spend some more time studying one or more of the Deadly Diseases then Out of the Crisis Chapter 3 is definitely your best source. And (assuming it is still available—see Day 5 page 1) the video Management’s Five Deadly Diseases will always be well worth a further viewing.
Another effect which might be seen on your radar diagram is that the shapes move rather further out along one of the four arms than along the others. Again the interpretation is clear—you’ll need to spend more time studying that particular part of the System of Profound Knowledge. If and when the time comes that you start working with The New Economics, I’ve given you the main page references during the Second Project; but, as I’ve mentioned before, material relevant to some of the topics in the May 1990 version (which we used throughout the Second Project) will be found elsewhere in the book. Help with several of the topics will also be found in Out of the Crisis, even though it predates the System of Profound Knowledge by a few years.
There really is no substitute for going back to the true source! DemDim has, of course, given you a start—I hope a good start, and that it will stay as a constant companion in the future. But I also hope very much that, if it hasn’t been already, it will soon be joined by both Out of the Crisis and The New Economics—and, maybe later, The Essential Deming (see Day 1 pages 12–13).
However, in addition, if at some time in the future you would like to study a rather different—though highly compatible—approach to the System of Profound Knowledge, I’ll refer you again to Bill Scherkenbach’s second book: Deming’s Road to Continual Improvement (from which we saw the “Theory of Knowledge in Seven Words” on Day 11 page 9). Chapter 5, appropriately headed “Logical Change”, is a substantial and deep study of the System of Profound Knowledge itself and of its “operationalisation”, Bill’s word for “putting it into practice”. And he certainly had had plenty of experience at putting the theory into practice by the time he wrote that book. Through most of the 1980s he was responsible for leading the learning and “operationalisation” of the Deming management philosophy throughout the Ford Motor Company worldwide. By the time he wrote his second book he had, with Dr Deming’s approval, moved over to General Motors as Group Director for Statistical and Process Improvement Methods at the Buick-Oldsmobile-Cadillac division of the company. Deming was pleased for him to have the opportunity to spread his good work more widely.
However, Bill’s second book (unlike his first) is not for the beginner. I would say that, if we regard our 12 Days course as being at undergraduate level, Deming’s Road to Continual Improvement is highly recommended reading for the postgraduate student.
ACTIVITY 12–a, Part 1
Your first task is simply to collect together all of your 0–5 scores from Activities 10a–b and 11a–b into the table on page 4. If you haven’t printed out an extra copy of that table (suggested on Day 11 page 36), it will make life easier if you temporarily detach that page so that you won’t have to keep turning back to it. (The table is deliberately set on a left-hand page because it will be convenient for you to have the table and the radar diagram on facing pages in the third part of this Activity.)